Multi-Contact MA270 Manuale d'uso
Pagina 4
Advanced Contact Technology
4 / 4
www.multi-contact.com
5
6
7
8
9
7
MC4
MC4-EVO 2
(ill. 5)
Sbloccaggio femmina Solmac
Inserire i perni di sbloccaggio di
PV-MS-PLS/2 nelle apposite
aperture del maschio
MC4-EVO 3
sulle linguette di bloccaggio della
femmina, rimuovere l’attrezzo dopo
lo sbloccaggio, infine staccare il
connettore.
Sbloccaggio maschio Solmac
Inserire i perni di sbloccaggio di
PV-MS-PLS/1 nelle apposite
aperture del maschio Solmac
sulle linguette di bloccaggio della
femmina
MC4-EVO 3 ed estrarre
quest’ultima dalla sede del connet-
tore Solmac.
(ill. 5)
Unlocking the Solmac socket
Insert the unlocking pins of
PV-MS-PLS/2 into the openings pro-
vided in the
MC4-EVO 3 plug and onto
the latch clips of the socket, remove the
tool after unlocking and then disconnect
the plug connector.
Unlocking the Solmac plug
Push the unlocking pins of
PV-MS-PLS/1 into the openings of the
Solmac plug and onto the latch clips
of the
MC4-EVO 3 socket and pull the
socket out of the Solmac plug housing.
(ill. 6)
Sbloccaggio maschio TwinBox
Inserire i perni di sbloccaggio di
PV-MS-PLS/1 sulle linguette di
bloccaggio della femmina
MC4,
quindi estrarre quest’ultima dalla
sede del connettore della TwinBox.
Nota:
Per sbloccaggi di altre combinazioni
di prodotti non illustrati nelle figure
fare riferimento alla matrice d’uso
(ill. 6)
Unlocking the Twin Box plug
Push the unlocking pins of
PV-MS-PLS/1 onto the latch clips of
the
MC4 socket and pull the socket out
of the plug housing of the TwinBox.
Note:
For unlocking operations on other
product combinations not shown in
the illustrations, please see the utilisa-
tion matrix.
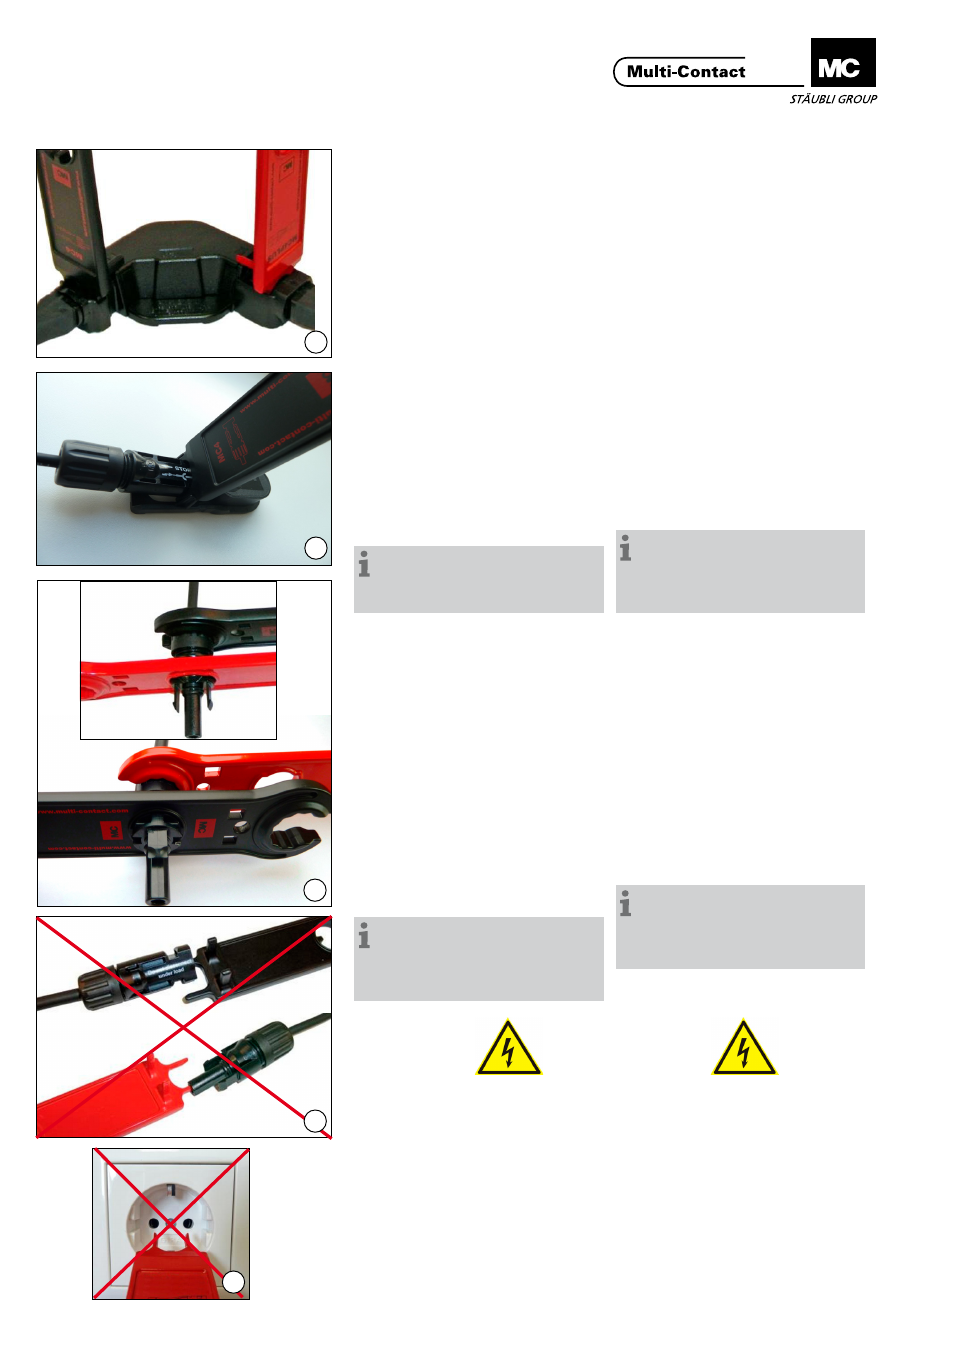
Serraggio dei connettori
Screw assembly of plug connec-
tions
(ill. 7)
Serraggio di MC4
Inserire la sede della femmina o del
maschio
MC4 nell’apposita apertura
di montaggio (supporto) di
PV-MS-PLS/2 e stringere il dado
cieco con la chiave ad anello di
PV-MS-PLS/1.
Serraggio di MC4-EVO 2
Inserire la sede della femmina o del
maschio MC4-EVO 2 nell‘apposita
apertura di montaggio (supporto)
di PC-MS-PLS/1 e stringere il dado
cieco con la chiave ad anello di PV-
MS-PLS/2.
Nota:
Per ulteriori dettagli sull’avvitamen-
to del dado cieco con il connettore
consultare le istruzioni di montaggio
MA231 (MC4) e MA273 (MC4-EVO 2).
(ill. 7)
Screw fixing of MC4
Insert the housing of the
MC4 socket or
plug in the assembly opening (holder)
of the
PV-MS-PLS/2 and screw on the
cap nut with the ring spanner of the
PV-MS-PLS/1.
Screw fixing of MC4-EVO 2
Insert the housing of the MC4-EVO 2
socket or plug in the assembly opening
(holder) of the PC-MS-PLS/1 and screw
on the cap nut with the ring spanner of
the PV-MS-PLS/2.
Note:
Further details on screwing the cap
nut onto the plug connector are given
in the assembly instructions MA231
(MC4) and MA273 (MC4-EVO 2).
Uso improprio
Misuse
(ill. 8)
Non inserire i perni di sbloccaggio di
PV-MS-PLS/1 e PV-MS-PLS/2 nei
maschi o nelle femmine dei connet-
tori MC.
(ill. 8)
Do not Insert the unlocking pins of
PV-MS-PLS/1 and PV-MS-PLS/2 in
sockets or plugs of the MC plug con-
nectors.
(ill. 9)
Non inserire i perni di sbloccaggio di
PV-MS-PLS/1 e PV-MS-PLS/2 in
una presa.
(ill. 9)
Do not insert the unlocking pins of the
PV-MS-PLS/2 and PV-MS-PLS/2 into
the openings of a mains power outlet.
© b
y Multi-Contact A
G, Switz
erland – MA270 – 10.2014, Inde
x e
, Global Communications – Salv
o modifiche / Subject to alterations